CISCO back to back E1 serial connection

Hi again!
So now that I'm shortly going to resume my CCNA R&S Course at the CISCO Networking Academy, I'm resuming my "Ciscoish" thoughts, tools and toys.
We are very encouraged to put "hands on stuff", and eBay makes easy and cheap to get decomissioned CISCO toys around, but serial cables are still expensive, the miriad of possible connectors are confusing for beginners (considering that lot of them have long time ago become obsolete), and more important, they are tend to be fragile, so far from ideal to play labs again and again with them!!!
The popular solution has been to use T1 interface cards, since they use rough, cheap, ethernet connectors and cabling (although with a special pinout cabling), and at config level, beyond T1 settings, at the end, you'll end up with a serial interface to play with.
There is but far less info on howto do same thing with E1 interface cards... Probably the fact that E1 standard was popular mostly in Europe is the root cause. In fact E1 standard was more often used in voice trunks than for pure data, and cards are marked as VWICs.
Chances are but, that if you're living in Europe, you can get on Ebay E1 cards more easily or at far lower cost than T1 Cards... So, it is time to write a E1 to E1, back to back, serial lab howto!
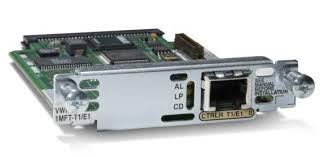
VWIC 1MFT-G703
This is the card most easily found and at lower price, since it is a simple, single interface, Voice trunk (G703) / Wan Connectivity interface card. They are often "included" in decomissioned eBay available routers from Germany.
It works, in 2800 and 1800 series routers or at least, in most of them. They also work in several other platforms, you should check documentation to ensure device - card compatibily.
Considering that eBay is flood of 2801s and 1841s we can consider them "popular", they're cheap, I own several, and VWIC 1MFT-G703 definitely do work on them.
So, This post is based on 2801/1841, IOS 12.4, and VWIC 1MFT-G703
The E1 serial-Crossover Ethernet cabling
Exactly the same as in T1, pinout on E1 Ethernet connectors do differ from either standard straight or crossover cables, so, you'll have to do your own... so, prepare your Ethernet connector tool.
Here is and scheme of the cabling... Google around for more images... they're easy to find and popular.
If the cable is correctly done, if you connect the two cards with it, and power the routers on, once cards are set to up by the router the orange "AL" LED will light up, and afterwards, upon correct Carrier Detection, "AL" LED will go off, and the green "CD" LED will light on instead.
IF "CD" LED does not lit on both routers, it means there is a cabling error.
Depending on cable fault it is easy to find one router card having "carrier detect" and the other staying in "AL". So check both routers!
Configuration
There are some differences in respect to T1 interfaces regarding configuration.
Most notably, T1 interfaces do behave as classic serial interfaces, since they're WAN adapters, and from the very first booting you got your Serialx/y/z interface.
VWIC 1MFT-G703 is a Voice/WAN interface, and will not provide a serial interface until so configured.
It can be configured, in fact, to provide multiple serial interfaces (although we will just configure a single one) as you group some of the 31 timeslots available per E1 trunk, at speeds of 56k or 64k per slot.
A single group with all 31 timeslots at 64kbps nears 2Mbps... not bad!!!
What will remain the same is the fact that one router has to act as timing clock reference, and the other one will sync to it.
Also, once we got our serial interface, most of the settings such as addressing, encapsulation and so are the usual ones found on classic serial interface configurations
So, after power, on you'll see a bare controller E1 0/1/0 interface.
If you insert the card into a VWIC capable slot such as in a 2801 slot 1, you'll also see a voice-card 0 interface.
Enable to config mode, switch to the controller interface configuration, and configure it like so...
On the clock timing router:
controller E1 0/X/0
 clock source internal
 channel-group 1 timeslots 1-31 speed 64
While on the second router:
controller E1 0/X/0
 clock source line
 channel-group 1 timeslots 1-31 speed 64
This will summon on both routers a Serial0/X/0:1 interface, you got it!!!
Now, there is no need to anything else special on those new serial interfaces, just config them to your taste, time to do labs!!!
interface Serial0/X/0:1
 ip address x.y.z.1 255.255.255.252
 encapsulation ppp
 ip nat inside
 ip virtual-reassembly
 bla, bla, bla
So... hope this may have helped, have a happy CISCOing!!!