The return of the Linux router... (from pfSense to Debian, part 2: OpenVPN bridged/tap mode setup)

So .... how a long time away ... I have in my TODO to update Ghost blog platform... it is now at 0.11.13!!!
Ok, exams are passed, CCNA at the networking academy is over, now summer time comes, so finally I'll be able to upload all my pending IT notes on working / production stable work to the blog...
Today is time to write about OpenVPN setup in Debian, but, while most of the posts and howtos around do talk about simple, sigle, abstract setups, which normally use Remote Access Layer3 setups (tun mode), here I'm going to talk about how to do the other way... Layer2 tap mode!.
First but, I would like to explain why I'm using Layer2 (tap) mode, because often, tap mode is not recommended, because of its many drawbacks and very little scalability.
But on the other hand... if the feature is there, count the devs know for some good reasons to work on it and maintain it...
So, why Layer2 mode? What's the scenario here... here we go...
Scenario and goals
We are deploying and supporting private cloud infrastructure at work... in fact, that's my responsablity, and we work with French provider OVH.
OVH includes, on all of its 'Infrastructure' type/branded services, a cool feature named 'vRack'.
vRack is a Layer2 , inter-datacenter, VLAN capable, fully transparent connection where you can attach a secondary NIC present on any 'infrastructure' OVH product.
AS you may imagine, this, toghether with virtualization solutions such as PROXMOX, and technologies like OpenVSwitch it is very easy to bridge many Layer2 virtual networks to vRack VLANs, achieving a very decent, high speed, reasonably low latency, stretched cloud infrastructure, at unbeatable low costs.
By using Layer2 VPN on virtual routers hosted at OVH hypervisors, instead of Layer3, this are the advantages I'm achieving:
- A single broadcast domain is kept spread accross all datacenters for every VLAN.
- Separate, independent, cross-datacenter networks can be created and assigned for customers or missions.
- Customers connecting to their cloud infrastructure do obtain a local IP address on the same subnet as their OVH cloud assets, either those are physical or virtual.
- By using OpenVPN client ability to manage and connect among a list of possible servers HA is achieved while keeping consistent IP addressing.
- No matter which server instance the customer client connects, the IP address it gets lays on the same subnet, so no routing involved.
- By using static IP leases, remote machines can get always same IP, no matter which redundant VPN server they choose to connect, so they can be accessed and monitored remotely from either the cloud or from another instance.
- Some services, specially some Windows ones, do love Layer2 connectivity
- Overall, for a small-sized network, this way, the classical frontiers physical/virtual local/remote do fall, and everything appears to be transparently connected.
I'm aware this does not scales very much, and the risk of Layer2 loop is present...but that's what STP is for.
There's also a theoretically limit of 4096 VLANs... but you can have many vRacks.
I'm also aware this means a lot of broadcasts going up and down VPN links and between data-centers.
I know routing protocols are more elegant, network segmentation increases security, and, definitely, I know Layer3 IS an alternative... but the facts are that with today's WAN speeds, and the size, number and needs of our customers.... well... it really, really works for us this way... no doubt, for us, here we choose Layer2/tap OpenVPN!!!
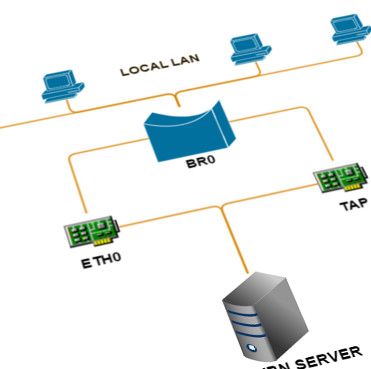
Server Network setup
In order to get the juice of Layer2/tap OpenVPN working mode, the server has to get certain network configuration.
In the example here, the server has 2 physical interfaces.
One, ens18, is the WAN facing one, public IP addressed (here I asume IP is obtained via DHCP from an ISP... on an OVH deployment, it may be a statically asigned OVH public 'IP-failover'
The second one, ens2 is the one connected to OVH vRack. This interface is connected to a layer2 bridge named br112
A virtual tap112 adapter is defined, this is the one OpenVPN server will use as common-for-all-tunnels end-point:
This means that all traffic (layer2 frames) from connected clients will 'appear' exiting from this interface, and, in turn, this interface is the entry point to any traffic going to reach any of the remote peers...
Do not confuse it with the interface (ens18 in this case) where the server really runs. The server will receive tunneled packets on the normal, public IP addressed interface (ens18) to/from clients, but once it gets the data (layer 2 frames) ready to release, it will 'drop' them down tap112 interface.
Therefore, we are going to connect this interface to the same br112 bridge!
Finally, there's the bridge itself, named interface br112
It has IP address configuration along with bridge configuration options, including declaration of bridge members as Layer2 ports (tap112 and ens2).
Also note the Spanning tree Protocol final line. You may consider setting it to 'on' like in this example if you expect risk of loops, although normally it is not needed.
Here is how it all may look at /etc/network/interfaces
allow-hotplug ens18
iface ens18 inet dhcp

allow-hotplug ens2
        iface ens2 inet manual

auto tap112
iface tap112 inet manual
        pre-up tunctl -u nobody -t tap112

auto br112
iface br112 inet static
        address 10.1.112.1
        netmask 255.255.255.0
        broadcast 10.1.112.255
        network 10.1.112.0
        bridge_ports tap112 ens2
        bridge_waitport 0
        bridge_fd 2
        bridge_hello 2
        bridge_maxage 12
        bridge_stp on
Server Configuration
Ok... now for the server settings itself.
Here I would like to note that I'm not entering into details about SSL/TLS Certificate stuff.
There's plenty of articles, docs and howtos about getting, creating and managing certificates, either validated through a valid external CA or by creating our tiny self-signed PKI infrastructure.
So, I just put into clear that you need, at least, a server certificate file, along with its key file, and the certificate file of the CA that signs the server certificate.
In this example I asume those 3 files are under /etc/openvpn/easy-rsa/keys and are named ca-cert.crt, fooserver.crt and fooserver.key
Most settings, such as IP, port, ip addressing pools or pushed routes and so on are just for filling the configuration stanzas with an example of valid data... those values should be changed with appropiate data.
I have also let some lines commented just to note that they are optional.... here it is:
mode server
local 1.2.3.4
port 1194
proto udp
dev tap10
user nobody
group nogroup

tls-server
ca /etc/openvpn/easy-rsa/keys/ca-cert.crt
cert /etc/openvpn/easy-rsa/keys/fooserver.crt
key /etc/openvpn/easy-rsa/keys/fooserver.key
dh /etc/openvpn/server/dh1024.pem
cipher AES-128-CBC
auth SHA1

persist-tun
persist-key

float
keepalive 10 60
ping-timer-rem
explicit-exit-notify 1

client-config-dir /etc/openvpn/server/fooserver/ccd
ifconfig-pool-persist /etc/openvpn/server/fooserver/ipp.txt
status /etc/openvpn/server/fooserver/status.log
log /var/log/openvpn/fooserver_server_openvpn.log
verb 3

ifconfig-pool 10.0.10.125 10.112.0.144 255.255.255.0
;push "route 10.0.10.0 255.255.255.0"
topology subnet

client-to-client
;max-clients 100

passtos
comp-lzo adaptive
And that's it!
...regarding client config, well... it is can be quite straighforward, specially when using Windows or OSX GUI clients, where there's nothing really different from the classic, tun routed/Layer3 mode extensively documented around.
If connecting from Linux, or whenever you're manually writting the client config, just remember the connection ends up with a tap Layer2 interface, not a tun Layer3 one...
Hope this is useful to someone... and 'till the next one!!!!